
Start Training

You have joined a use case and accepted the terms. Training a model is as easy as connecting to the client from a local script or notebook, then submitting models for training directly to the client‘s infrastructure. For a smooth first run, lets follow the step by step notebook in the public GitHub repository along with the documentation below.

Pull Training Notebook and Model Repositories

Create a tracebloc folder and pull the Training GitHub repository and the Model Zoo GitHub repository. The notebook contains all commands to connect and start training, the model zoo has a selection of compatible models ready for training. Open a terminal and run the following commands:

mkdir tracebloc && cd tracebloc

git clone https://github.com/tracebloc/start-training.git
git clone https://github.com/tracebloc/model-zoo.git

cd start-training

Then, install the Anaconda package manager.

Create a Virtual Environment

Create a new environment, name it for example "tracebloc":

conda create -n tracebloc python=3.9
conda activate tracebloc

Then, install requirements:

python -m pip install --upgrade pip
pip install tracebloc_package

Install and Launch Jupyter Notebook

Install Jupyter into your environments:

conda install jupyter notebook

Launch the notebook:

jupyter notebook notebooks/traceblocTrainingGuide.ipynb

1. Connect to the tracebloc Client

Follow the instructions in the notebook to authenticate. Have your tracebloc user credentials ready:
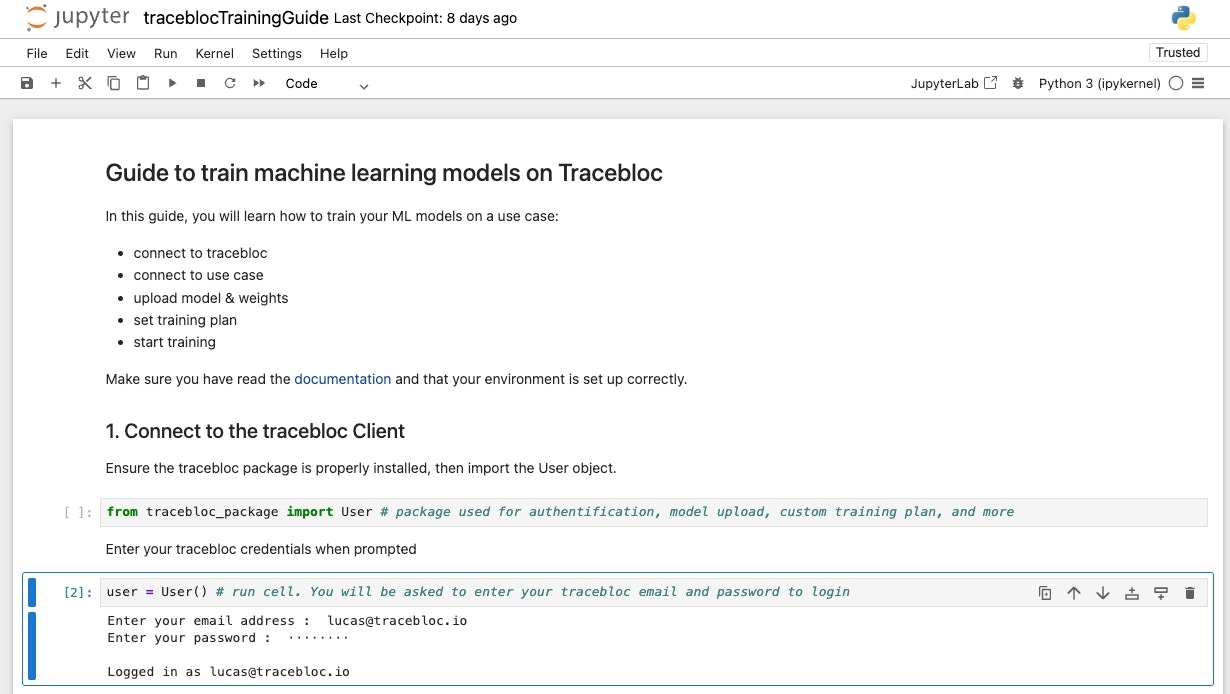
Log in

Getting Help

For more info about available functions and methods, call the help function:

user.help()

2. Upload Model & Weights File

Define and Upload your Model Architecture

You can define any model architecture and training strategy — see the model optimisation section for details. However, we recommend starting with the tracebloc model zoo: Go to the repository, choose a model for your use case and make sure key parameters match the dataset:

Data TypeTaskModel Parameters
ImageClassificationimage_size has to match image x/y-dimensions
output_classes has to match # of image classes
ImageObject Detectionimage_size has to match image x/y-dimensions
output_classes has to match # of object types
ImageSemantic Segmentationimage_size has to match image x/y-dimensions
output_classes has to match # of object classes
ImageKeypoint Detectionimage_size has to match image x/y-dimensions
output_classes has to match # of object classes
num_feature_points has to match # of keypoints
TabularTabular Classificationoutput_classes has to match # of classes
num_feature_points has to match # of features
TextText Classificationinput_shape
sequence_length
output_classes

You can find all the necessary info and parameters from the use case description and EDA.

For example: A 3-way classification task on 224x224 images with LeNet would need the following lenet.py configuration:

import torch
import torch.nn as nn

# Mandatory variables, adapt as necessary.
framework = "pytorch"
main_class = "MyModel"
image_size = 224
batch_size = 16
output_classes = 3
category = "image_classification"


class MyModel(nn.Module):
def __init__(self):
super(MyModel, self).__init__()
self.layer1 = nn.Sequential(
nn.Conv2d(3, 6, kernel_size=5, stride=1, padding=0),
nn.BatchNorm2d(6),
nn.ReLU(),
nn.MaxPool2d(kernel_size=2, stride=2),
)
self.layer2 = nn.Sequential(
nn.Conv2d(6, 16, kernel_size=5, stride=1, padding=0),
nn.BatchNorm2d(16),
nn.ReLU(),
nn.MaxPool2d(kernel_size=2, stride=2),
)
self.fc = nn.Linear(16 * 53 * 53, 120)
self.relu = nn.ReLU()
self.fc1 = nn.Linear(120, 84)
self.relu1 = nn.ReLU()
self.fc2 = nn.Linear(84, output_classes)

def forward(self, x):
out = self.layer1(x)
out = self.layer2(out)
out = out.reshape(out.size(0), -1)
out = self.fc(out)
out = self.relu(out)
out = self.fc1(out)
out = self.relu1(out)
out = self.fc2(out)
return out

The variables at the top are mandatory for the use case client but the model definition is fully flexible.

Edit the model architectures in the model zoo depending on your task, framework and model type. Then navigate back to the notebook and upload the model to the use case client:

user.uploadModel(`../../model-zoo/model_zoo/<task>/<framework>/model.py`)
info
  • In case of multiple uploads, only the most recently uploaded model will be linked to the dataset.

For more instructions how to customize models and use different frameworks, refer to the model optimisation section.

Use Pre-trained Weights (Optional)

Upload weights along with your model in the user.uploadModel() step and set weights=True, the default value is False:

user.uploadModel(`../../model-zoo/model_zoo/<task>/<framework>/model.py`, weights=True)

A weights file with the same base name as the model and suffix "_weights.pkl" must exist in the same directory. For example, if the model file is "mymodel.py", the corresponding weights file should be "mymodel_weights.pkl".

model/
- model.py
- model_weights.pkl

Navigate to the use case and copy the "Training Dataset ID" at the center of the use case pane and enter it to establish the link

trainingObject = user.linkModelDataset('Dataset ID')

You should get "Assignment successful!" and the dataset parameters.

4. Set Training Plan

Set the experiment name and configure hyperparameters:

# Set experiment name
trainingObject.experimentName("My Experiment")

# Set training parameters
trainingObject.epochs(10)
...

# Get training plan
trainingObject.getTrainingPlan()

Get the training plan to check settings before you start the training. For a detailed list of all hyperparameter options, see Model Optimization

5. Start Training

To send the model to the client infrastructure and start training on the training data, run:

trainingObject.start()

Go to the tracebloc website and your use case, then navicate to the "Training/Finetuning" tab you will see your experiment. Monitor the training process hover over the learning curves to check the performance at specific epochs and cycles.

info

If you want to run a second experiment, overwrite parameters and re-start training with trainingObject.start().

Pause, Re-Start and Stop:

To pause, stop, or resume running experiments, click here:

Experiment Controls

Once stopped, an experiment cannot be rerun.

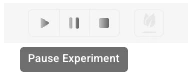
Submit an Experiment to the Leaderboard

Once training is complete, submit the model to the leaderboard:

  1. Select the best performing training cycle during which you want to evaluate the performance on the test dataset and submit the model.
  2. Click "Submit" to start inference on the test dataset. Once complete, you will see the model's performance on the Leaderboard.

Submit a Model

Note: Be aware of the daily submission limits. You can track how many submissions your team has left at the top of the use case page.

Inviting other Users to your Team

To invite others to your team, click on the "+" button next to your team name on the top right of the use case view.

Next Steps


Need Help?

For more info about available functions and methods, call the help function in your notebook:

user.help()