Setting Up Jupyter Notebook
This section will teach you how to train your model locally using Jupyter Notebook.
Prerequisites
Before you can start using Jupyter Notebook, you will need to install some software and set up your environment.
1. Install Anaconda
To install Anaconda, run the following commands in your terminal:
wget https://repo.anaconda.com/archive/Anaconda3-2020.11-Linux-x86_64.sh
bash Anaconda3-2020.11-Linux-x86_64.sh -b -p -y
source ~/.bashrc
2. Create and Activate an Environment
An environment is a self-contained installation of Python and its packages. To create a new environment and activate it, run the following commands:
conda create -n 'name environment' python=3.8
conda activate 'environment'
Replace 'name environment' with the desired name for your environment.
3. Clone the Git Repository
To clone the Git repository, run the following commands:
git clone https://gitlab.com/tracebloc/datascientist.git
cd 'path to the cloned repository'
4. Install Required Packages
To install the required packages for this project, run the following command:
pip install -r requirement.txt
5. Install Tensorflow and Keras
To install Tensorflow and Keras, run the following commands:
pip install tensorflow==2.12.0
Note: If you are using a Mac M1 machine, follow these steps instead:
conda install -c apple tensorflow-deps
pip install tensorflow-macos
pip install tensorflow-metal
pip uninstall -y numpy
pip uninstall -y setuptools
pip install numpy
pip install setuptools
For more information on installing Tensorflow on a Mac M1 machine, see this tutorial.
Then, install Keras by running the following command:
pip install keras==2.12.0
6. Install Jupyter Notebook
To install Jupyter Notebook, run the following commands:
conda install jupyter notebook
pip install jupyter
7. Training
Now, to train a model using our service, you need to follow these steps:
7.1 Open a Jupyter Notebook
Run jupyter notebook in the terminal.
jupyter notebook
7.2 Connect to Tracebloc
In the Jupyter Notebook, enter the following code to connect to Tracebloc's service:
from tracebloc_package import User
user = User()
7.3 Upload Model & Weights File
- To upload your model and weights file, make sure that your model meets our Model Structure Requirements.
- You can find sample models to test in our Tracebloc Model Zoo.
- Also, make sure that the model file name follows the convention: if the model file name is "model.py", the model weight file name should be "model_weights.pkl".
- If you want to upload model with pre-trained weights set weights arugment value as True, else the default value is False.
user.uploadModel('filename') # (model, weights=True)
7.4 Link Model with Dataset
In this step, you will link the uploaded model to the dataset you would like to train on. To do this, you can use the linkModelDataset method of the user object and pass in the dataset ID as a parameter.
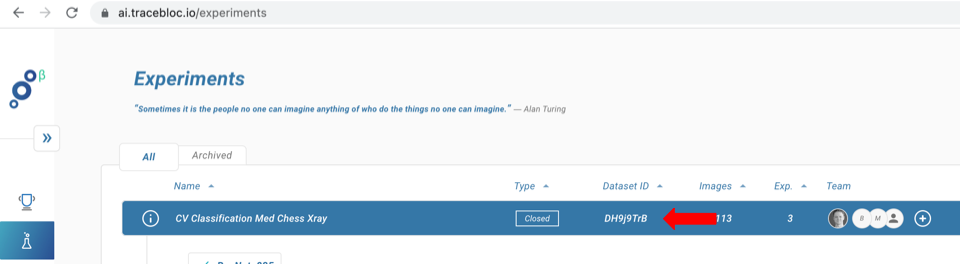
trainingObject = user.linkModelDataset('datasetID') # link dataset to uploaded model in previous step
You can find the dataset's ID in Tracebloc's web application (see image below).
The dataset and model need to match with respect to the number of classes. For more details click here.
7.5 Set Training Plan
In this step, you can set the training plan for your model by specifying various parameters such as the number of epochs, optimizer, learning rate, etc. Here's an example of how to set a parameter:
trainingObject.parameter_name(value)
For example:
trainingObject.epochs(5)
trainingObject.optimizer('sgd')
For more information on each parameter's value follow docstring.
Display the training plan
trainingObject.getTrainingPlan() # will display all parameters
Reset the training plan
trainingObject.resetTrainingPlan() # will reset all parameters
All training parameters
Training Description

experimentName: Give your experiment a name for easy colaboration with your peers! :)
modelName: densenet
objective:

Dataset Parameters

datasetId: DKbtefZy
totalDatasetSize: 150
allClasses: {'car': 65, 'traffic light': 42, 'traffic sign': 43}

trainingDatasetSize: 150
trainingClasses: {'car': 65, 'traffic light': 42, 'traffic sign': 43}
imageShape: 224
imageType: rgb
seed: False

Training Parameters

epochs: 10
cycles: 1
batchSize: 16
validation_split: 0.06

Hyperparameters

optimizer: sgd
lossFunction: {'type': 'standard', 'value': 'categorical_crossentropy'}
learningRate: {'type': 'constant', 'value': 0.001}
layersFreeze:
earlystopCallback: {}
reducelrCallback: {}
modelCheckpointCallback: {}
terminateOnNaNCallback: {}

Augmentation Parameters

brightness_range: None
channel_shift_range: 0.0
cval: 0.0
fill_mode: nearest
height_shift_range: 0.0
horizontal_flip: False
rescale: None
rotation_range: 0
samplewise_center: False
samplewise_std_normalization: False
shear_range: 0.0
shuffle: True
vertical_flip: False
width_shift_range: 0.0
zoom_range: 0.0
7.6 Start Training
Once you have linked your model with the dataset and set the training plan, you can start the training process by calling the start method:
trainingObject.start() # start the experiment as configured above
This will start the training process and you can monitor the progress of your model via clicking the link of experiment provided.
Logout
You can log out to ensure the security of your account. To do this, simply call the logout method:
user.logout()